Floor sanding
Floor sanding is the process of removing the top surfaces of a wooden floor by sanding with abrasive materials.
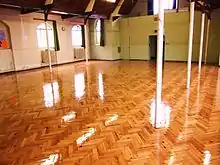
A variety of floor materials can be sanded, including timber, cork, particleboard, and sometimes parquet. Some floors are laid and designed for sanding.[1] Many old floors are sanded after the previous coverings are removed and suitable wood is found hidden beneath. Floor sanding usually involves three stages: Preparation, sanding, and coating with a protective sealant.
Machines
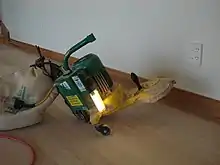
All modern sanding projects are completed with specialized sanding machines. The majority of material is removed by large 220 volt belt or drum sander. Belt sanders are preferred for the continuous sand paper belt design to prevent sanding machine marks in floors. The belt sander was invented by Eugen Laegler in 1969 out of Güglingen, Germany. 90% of the area can be reached with the belt/drum sander. The remaining 10% left such as edges, corners, under cabinets, and stairs, are sanded by an edge sanding machine. A rotary machine known as a multi disc sander or buffer is then used for the final sanding steps. The buffers take abrasive discs, which rotate in same plain is the floor itself. The power of the stripping relies on the weight of the machine and therefore can be useful for surface treatments like buffing, light sanding or stripping old sealants. In the belt sanders the abrasive material is fitted and secured tight between a drum and a tension device. The belt moves vertically, along the grain of the floor surface, which assures a powerful stripping, good finish and a lasting abrasive. In drum sanders it is fitted just around the drum itself, which is less secure and retains a risk of leaving marks on a newly sanded surface.
A buffing machine is used also in the final stages of wood floor refinishing. This is a rotary machine with attached fine abrasives which helps remove differences between the vertical and horizontal circulations of the sanding drums and the disk of the edging machines. These fine abrasives also help to smooth the final finish by removing minor imperfections on the surface prior and between re-coatings.[2]
Majority of modern floor sanding machines collect the saw dust from the sanding. Some uncaptured dust particles will not be visible for the eye and may settle down hours after the sanding is complete. Suitable respirator masks are recommended for sanding equipment that does not incorporate dust capturing facility at all.[3]
Process
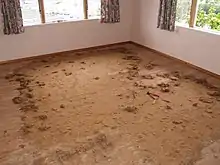
Preparation is the first stage of the sanding process. All nails which protrude above the boards are punched down. Nails can severely damage the sanding machines which are being used. Staples or tacks used to fasten previous coverings (if any) are removed to reduce the possibility of damage. Some brands or types of adhesives which have been used to secure coverings may need to be removed. Some adhesives clog papers and running gear of the machines used, and some can even make sanding impossible.
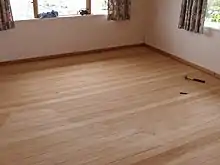
After the floor is prepared, the sanding begins. The first cut is done with coarse-grit papers to remove old coatings and to make the floor flat. The differences in height between the boards are removed. The large sanders are used across the grain of the timber. The most common paper used for the first cut is 40 grit.[4]
References
- Newnes (1984). Newnes all colour reference DIY and home improvement. London: Newnes Books.
- "Advanced guide on the different floor sanding machines". FlooringFirst.
- "Floor Sanding Company London". Floor-sanding.com.
- "» Sand and Seal Restoring Timber Floor".