1st Armoured Division (United Kingdom)
The 1st Armoured Division was an armoured division of the British Army. It was formed in November 1937, as the Mobile Division, after years of debate on the creation of such a formation. Over the following three years, its intended role and structure were finalized. Following the outbreak of the Second World War, in 1939, it was steadily drained of resources that were used to reinforce the BEF or create new formations. It May 1940, after the Battle of France began, it was deployed to France. It was unable to reinforce the British Expeditionary Force, which was heavily engaged fighting near the Belgium border, and was landed at Cherbourg. Due to the German advance, the division was stuck to the west of the Somme and made several attempts to push east to the BEF and lost large numbers of tanks in the process. As the strategic situation worsened, the BEF was withdrawn from France from Dunkirk, and the division withdrew from ports in Normandy and Brittany during Operation Aerial.
| Mobile Division 1st Armoured Division 1st British Armoured Division | |
|---|---|
 The second variant of the divisional rhinoceros insignia, used from 1942–1945. | |
| Active | 1937–1945 1946–1947 |
| Country | |
| Branch | |
| Type | Armour |
| Size | 9,442–14,964 men ~350 tanks[lower-alpha 1] |
| Engagements | Battle of France Battle of Gazala Battle of Mersa Matruh First Battle of El Alamein Second Battle of El Alamein Battle of the Mareth Line Battle of Wadi Akarit Battle of Coriano |
| Commanders | |
| Notable commanders | Herbert Lumsden, Willoughby Norrie |
| Insignia | |
| First divisional insignia adopted |  |
| Insignia used between 1946–1947 |  |
The division was subsequently deployed to Egypt, where it fought in the Western Desert campaign. The first major engagement came during the Battle of Gazala, in June 1942, where the division suffered several reverses and heavy tank losses. This was swiftly followed by the battles of Mersa Matruh and the First Battle of El Alamein. The division was then refitted, and adopted a revised rhinoceros insignia. The initial design was considered overly passive, and the new variant incorporated a more aggressive looking and charging design. The division then fought in Second Battle of El Alamein, advanced across Egypt, Italian-Libya, and then fought in the Tunisian campaign. In 1944, it was deployed to Italy and fought in the Italian campaign. During this period, it was officially renamed the 1st British Armoured Division to avoid any confusion with the American 1st Armored Division. By the end of the year, the division ceased to be an operational formation and was broken-up. It was officially disbanded in January 1945.
In 1946, in the post-war years, the 6th Armoured Division was redesignated as the 1st Armoured Division. The 6th Armoured Division's mailed fist was maintained as the insignia during this period. It served briefly in Italy, before it was transferred to Palestine. In 1947, it was disbanded. In the 1960s, the 1st Division - a formation within the British Army of the Rhine - was renamed as the 1st Armoured Division. It remained based in Germany throughout the Cold War and fought in the Gulf War. That formation has since become the 1st (United Kingdom) Division.
Background and formation
During the interwar period, the British Army examined the lessons learnt from the First World War; and a need was seen for experimentation with and development of theories of manoeuvre and armoured warfare, as well as the creation of the short-lived Experimental Mechanized Force.[2] The long-term impact was for the army to start to move towards mechanisation, to enhance battlefield mobility.[3] During the early 1930s, General Archibald Montgomery-Massingberd, the Chief of the Imperial General Staff (CIGS) advocated for the formation of a tank-based force, dubbed a Mobile Division. The formation would be used to screen the advance of the British Expeditionary Force (BEF), as the Cavalry Division had in 1914.[4] In early 1937, British planning assumed that a European War would be fought between Germany against Belgium, France, and the UK. The BEF would be dispatched to Europe to supplement the Franco-Belgian forces and would consist of four infantry and one mobile division. The plan envisioned, assuming conditions within the UK allowed, the mobile division being sent seven days into the war and around one week ahead of the infantry force. By the end of the year, the timetable had been updated to the entire force being ready to embark, to be deployed, 21-days into the war.[5]
During 1937, the army was split on how to implement an armoured formation. General John Burnett-Stuart argued for a formation of cavalry regiments, equipped with light tanks, to be used in a screening role. Colonel Percy Hobart, deputy director for staff studies, favored a more balanced force that included light tanks, more heavily armoured and armed tanks, mechanized infantry and supporting arms. B. H. Liddell Hart, a military theorist, supported this idea and influenced Leslie Hore-Belisha, the Secretary of State for War, on the subject. The division announced in November, was based on this latter idea.[6][7] The Mobile Division was formed with six light tank regiments, split between the 1st Light and the 2nd Light Armoured Brigades; three regiments of medium tanks, which formed the Tank Brigade; two motorised infantry battalions, and two artillery regiments. On-paper, the formation was to have 620 armoured vehicles. However, on formation, it had around only one-eighth of these vehicles and made do with trucks for training purposes.[8][9][10] David French, a historian, commented that cavalry officers largely supported mechanization. However, they resisted turning their regiments into motorised infantry and argued that light tanks better replaced horses and allowed the regiments to continue their traditional reconnaissance role. French argued that this had a detrimental effect on the outcome of the forming division. It was now 'tank heavy', with too few supporting infantry and with all light-tank regiments committed exclusively to reconnaissance.[9] A rhinoceros, being the most heavily armoured animal, was chosen as the divisional insignia.[11]
The creation of the division was followed by a brief dispute on who should command it. General Cyril Deverell, now CIGS, favoured Major-General John Blakiston-Huston to take command. Blakiston-Huston was a cavalry officer, and Deverell believed it was an appropriate choice considering the majority of the forces assigned to the division were from cavalry regiments. This choice was opposed by Hore-Belisha and senior army officers. Liddell Hart argued for an officer from the Royal Tank Corps, as the formation would need someone with experience of tanks and armoured warfare. Hart favoured Hobart, Frederick Alfred Pile, or Charles Broad. In a compromise, Major-General Alan Brooke, who had served in the artillery and had no prior experience in mobile forces or their training, was appointed to command the division on 24 November 1937.[12][13]
Thereafter, the army established three types of divisions and solidified the role of the mobile division. Infantry divisions would penetrate the enemy's defensive line, with the support of infantry tanks. Any gap created would then be exploited by mobile divisions, and the territory captured would be secured by fast-moving motor divisions (motorised infantry). It was envisioned that this would transform the attack into a break-through and maintain mobility.[14] Burnett-Stuart, who had been responsible for the training of the Mobile Division, influenced its doctrine. He argued that the assigned infantry was not "to be put on to a position by tanks and told to hold it, and they are not meant to fight side by side with your tanks in the forefront"; the infantry's role was simply to protect the tanks when they were stationary. Burnett-Stuart's tactics did not conform with British doctrine, which promoted combined-arms co-operation to win battles, as did German armoured warfare doctrine that held tanks by themselves would not be a decisive weapon. However, Burnett-Stuart's thinking predominated within the British armoured forces until a doctrine reformation occurred in 1942.[9]
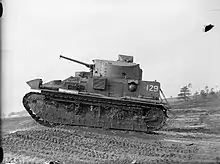
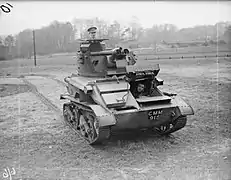
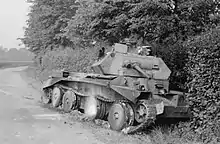
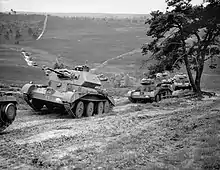
On 15 July 1938, Major-General Roger Evans, a cavalry officer, took command of the division following the promotion of Brooke. By this point, the Vickers Medium Mark II, which were the main weapon system of the tank brigade, were considered obsolete. Starting in December, the first deliveries of modern cruiser tanks arrived to replace them.[10][15] In April 1939, the division was renamed the 1st Armoured Division.[9] The following month, the army developed a new organisation for such divisions. The intent was for the division to have one light armoured brigade with 108 light tanks and 66 light cruisers, and one heavy armoured brigade equipped with 78 light cruisers, 45 heavy cruisers, and 24 tanks equipped to provide close support. Additionally, 13 heavy cruisers and 15 light cruisers were to be spread around the divisional and brigade headquarters. This would provide a division with 349 tanks. The division's support group was to have one artillery regiment, one anti-aircraft/anti-tank regiment, engineers, and two infantry battalions.[16][lower-alpha 2]
By 1939, tensions between Germany and the UK had intensified.[21] In the preceding two years, German demands for the annexation of the Sudetenland in Czechoslovakia had led to an international crisis. This was resolved in September 1938 by the Munich Agreement, which allowed for aGerman annexation of the territory.[22] Tensions did not subside, and the British government debated how best to prepare the army for war. In January 1939, Hore-Belisha proposed splitting the Mobile Division into two smaller formations but found no support for this move.[23] The issue was broached again a month later, and was accepted in principle by the cabinet.[24][lower-alpha 3] Shortly after, the French were informed of a preliminary timetable for the arrival of the BEF in the event of war: "One Regular Armoured Division will become available about the middle of 1940, the second would not be available 'till a later date'". The formation of a second division during this period was complicated by the slow pace of British tank production.[25]
Second World War
Home service and Battle of France
On the outbreak of the Second World War, on 3 September 1939, the division consisted of the 1st Light, the 1st Heavy, and the 2nd Light Armoured Brigades.[26] During October, the support group had its two regiments of artillery withdrawn, and they were dispatched to France to join the BEF.[27] The following month, the 1st Light Brigade was removed from the division and would be used to form the 2nd Armoured Division over the following months.[28] The departure of the 1st Light Brigade's 77 light tanks, left the division with 190 light and 25 cruiser tanks.[29] During the same period, the Commander-in-Chief, Home Forces, General Walter Kirke, was tasked with drawing up a plan, codenamed Julius Caesar, to defend the UK from a potential German invasion.[lower-alpha 4] The 1st Armoured Division's role was to be within striking distance of the East Anglian coast, which was assumed to be the most vulnerable point of the country. The 2nd Light Brigade and the support group were located in west Suffolk and northwest Essex, while the heavy brigade was further inland in Hertfordshire. A small number of tanks and an infantry company were maintained as a separate unit, to counter any small-scale German paratrooper landings.[31] During January, with the risk of a landing subdued due to winter, the division moved and concentrated in Dorset for training.[32] On 14 April, the 1st Light Armoured Brigade was designated as the 1st Armoured Brigade, and the 1st Heavy Brigade was designated as the 3rd Armoured Brigade.[33] Later in the month, the infantry of the Support Group were transferred to the 30th Infantry Brigade.[34] By 3 May 1940, the tank strength of the division had increased to 203 light and 121 cruiser tanks.[35] It was intended that the division would cross-over to France and finalise its training at Pacy-sur-Eure, Normandy.[36]
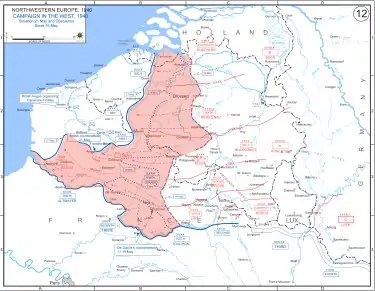
However, on 10 May 1940, the Phoney War—the period of inactivity on the Western Front since the start of the conflict—ended as the German military invaded Belgium and the Netherlands. As the Allied forces advanced to meet the German invasion, the main German attack came via the Ardennes Forest and on into France. This subsequently split the Allied forces in Belgium from the rest of the French military along the Franco-German border.[37] The 1st Armoured Division, now 114 light and 143 cruiser tanks strong and still in Dorset, was now ordered to France.[38][39] The division lacked spare parts, bridging equipment, did not have all the required wireless equipment, lacked a full complement of anti-tank or anti-aircraft guns, and had no tank reserves to replace losses. An advance party of the division landed at Le Havre on May 15 and moved to Arras. It was intended for the rest of the division to follow suit. Approaching German forces, coupled with Le Havre coming under aerial attack and the port being mined, resulted in the decision for the rest of the division to be unloaded at Cherbourg. On 19 May, the first meaningful elements of the division landed.[39][40] On 22 May, the 3rd Armoured Brigade had one of its regiments removed and they were also transferred to the 30th Infantry Brigade.[lower-alpha 5]
The division was ordered to seize and hold bridges across the Somme, between Picquigny and Pont-Remy. Thereafter, it would move to support the BEF as circumstances dictated. The leading elements of the division arrived near Rouen on 22 May. The following day, still not fully concentrated, Evans and his staff were aware that up to six German armoured divisions were on the east side of the Somme, although they were believed to have been greatly weakened by the fighting of their advance. There was also the impression that the Battle of Arras, two days previously and had already concluded, had begun a general Anglo-French counterattack. There was in fact ten German divisions operating in this area, they were not as weakened as British command believed, they had already seized and reinforced bridgeheads across the Somme, and had completed the encirclement of the BEF.[42][43] Conflicting orders were issued, the BEF ordered the division to advance on the Somme with haste and with whatever units were available, then on to Saint-Pol to "cut the rear of the enemy who are about St Omer and relieve the threat to the right of the BEF."[44] Général Alphonse Joseph Georges, commander of all French forces operating in the northeast of the country, ordered the 1st Armoured Division to move towards Abbeville and clear the area of German forces, which were implied to be in small numbers. After completing this task, they were to move towards and provide flanking cover to the BEF. The French Seventh Army ordered a third set of instructions, which stated the division was under their command and was to provide that army with flanking protection for an attack on Amiens. Evans held the opinion that his force would not be able to achieve any mission due to the lack of infantry, supporting arms, and due to his division still not being intact.[45]
The first elements of the 2nd Armoured Brigade reached the Somme around 01:00 on 24 May. Two tanks were lost due to mines, and the brigade found the bridges to be heavily guarded. A few hours later, the brigade was reinforced with the 4th Battalion, Border Regiment. A second attempt was made at three crossings, with each assigned one infantry company and one troop of tanks from the 2nd Dragoon Guards (Queen's Bays). Numerous tanks and men were lost attempting to reach two, with the attacks repulsed. At Ailly-sur-Somme, near Amiens, men from the 4th Dorsets were able to secure a bridgehead but the bridge was destroyed. The attack was called off and the soldiers withdrawn back across the river. By the end of the day, the division had been ordered to hold its position.[46] On 26 May, after receiving orders from London to come under French command and the division having finally completed its landing in France, Evan's was ordered to split his force. The 2nd Armoured Brigade was to move to Biencourt and support the French 2nd Light Cavalry Division, while the 3rd Armoured Brigade would move to Buigny and support the French 5th Light Cavalry Division.[47] The following day, this force launched aborted attacks on dug-in German positions guarding several bridgeheads. Tank attacks, without infantry or other supporting arms, resulted in the division losing 65 tanks. Fifty-five more tanks suffered from mechanical breakdowns during the day, due to the lack of maintenance between landing and moving to the front.[48]
Over the following days, the encircled BEF evacuated. The 1st Armoured Division, and the remaining British forces in France, assisted the French with holding a defensive line along the Somme as the French had now appreciated the division could not force a bridge crossing with the way it was designed or outfitted.[49] On 5 June, elements of the division assisted the 51st (Highland) Infantry Division near Oisemont and lost several tanks in the process. The following day, further German attacks were made in this area and the division helped repel them and took 44 prisoners.[50] It then came under the command of the French Tenth Army and the remnants of the division started to concentrate, with the instruction to launch a counterattack into the southern flank of the renewed German advance. No significant attack occurred, and the division withdrew beyond the Seine on 8 June.[51][52] In the final stages of the campaign, the UK attempted to reinforce France with a second BEF while the French considered a national redoubt in Brittany that would include the division. Shortly after, the proposal was rejected and all British forces were ordered to withdraw from France, with the 1st Armoured Division directed to move to Cherbourg. The 2nd Armoured Brigade's tanks were put onboard trains to take them to Cherbourg, but they never arrived. The 3rd Armoured Brigade's remaining 26 tanks moved by road. Between 16–18 June, the division was withdrawn from Brest, Cherbourg, and Saint-Nazaire during Operation Aerial.[39][53] The division returned to the UK with just 13 tanks.[54]
The formation was placed in reserve and moved to Surrey to undertake anti-invasion duties, and given priority for tank production, over the 2nd Armoured Division, so that it could rebuild. By the October, the division had been built-up to 18 light and 133 cruiser tanks.[11][55] The same month, the 3rd Armoured Brigade was replaced by the 22nd Armoured Brigade. In April 1941, tanks were withdrawn and then transported to reinforce British forces in Egypt via the Tiger convoy. In June, with stalemate in the Western Desert campaign that was being fought in Egypt and Italian Libya, Lieutenant-General Claude Auchinleck (commanding British forces in North Africa and the Middle East) informed the UK that he needed at least two and ideally three armoured divisions to undertake offensive action into Libya to lift the siege of Tobruk. The division then had additional tanks removed and shipped to Egypt. This was followed by the 22nd Armoured Brigade being detached and dispatched as well.[56][57][58] The rest of the division, equipped with 60 M3 Stuart light and 124 Crusader tanks, departed the UK in August onboard convoy WS 12.[59]
Battle of Gazala
When the division arrived in Egypt, in mid-November, the latest British offensive - Operation Crusader - had already started. Major-General Herbert Lumsden now held command, and his force was ordered to undertake desert training.[60][61] By the end of December, Crusader had concluded with an Axis withdrawal to western Libya. The 1st Armoured Division moved into eastern Libya and took over the frontline and was reinforced with the 200th Guards Brigade. Apart from small infantry forces, the division was the only force within 100 miles (160 km) of the frontline. It was reinforced with additional infantry and artillery units, although these had never trained with the division before. Divisional-level training was intended to continue, however inadequate stocks of fuel interrupted such effort. In early January, the division was subjected to an aerial attack that wounded Lumsden. He was replaced by Major-General Frank Messervy.[62][63] On 21 January 1942, Axis forces attacked the 150-tank strong division. The 1st Armoured Division began a fighting withdrawal and then, along with the rest of the Eighth Army, retreated until the army regrouped at Gazala in February. It lost 42 tanks in combat with a further 30 damaged or abandoned.[64][65][lower-alpha 6]
Lumsden resumed command of the division on 12 February 1942, and the 22nd Armoured Brigade rejoined in April.[66][lower-alpha 7] Michael Carver, a former general, historian, and participant of the battle, claimed that Lumsden held an animosity towards Messervy for the setback that had befell the division in January. Messervy's 7th Armoured Divisions, with just one armoured brigade, was considered to as strong as the 1st due to both formations having an equal number of M3 Grant medium tanks. Carver claimed that these two factors made Lumsden reluctant to go to the support of the 7th if called upon and adamant than none of his force would be allocated to it.[68]
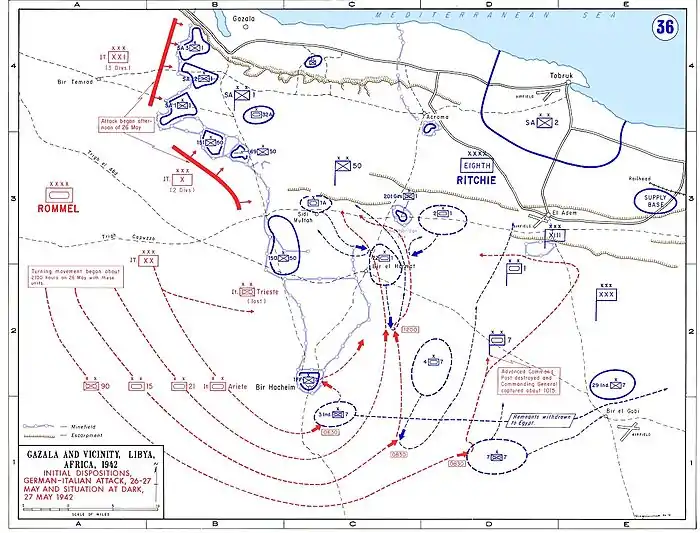
On 26 May, Axis forces struck the Allied positions and initiated the Battle of Gazala.[69] The next morning, the division was ordered to send the 22nd Armoured Brigade to join the 7th Armoured Division after it was realized a major Axis attack was underway. Carver claimed that there was an "acrimonious exchange" between Lumsden and XIII Corps headquarters, the parent formation of the 1st Armoured Division, and no order was issued for two hours.[70] The 22nd Armoured Brigade was set-upon by Axis armoured forces, lost 30 tanks, and withdraw north. In the afternoon, the division counterattacked in full force, later supported by the 1st Army Tank Brigade, and checked the Axis advance.[71][72] Over the following days, the division engaged the German 15th Panzer and the Italian 132nd Armored Division "Ariete" with mixed success.[73][74][lower-alpha 8]
By 12 June, tank crew moral was low and the relationship between Lumsden and Messervy had deteriorated further. The brigadiers of the division's armoured brigades, which had temporarily been assigned to the 7th Armoured Division, had requested to be returned to the 1st and this further eroded the relationship with Messervy. During the day, the tanks of the 7th Armoured Division were placed under the command of the 1st, and it was able to muster 83 Grants, 59 Crusaders, and 64 Stuarts. That day, the division battled the 15th and 21st Panzer Divisions. Initial success at halting a German tank attack was followed by the 4th Armoured Brigade being mauled and ending the day with 15 tanks out of 95 it had started with. The division had been reduced to 50 tanks. While tank losses had been heavy, most were able to be recovered and had been sent to workshops to be repaired.[77][78] On 13 June, the division's infantry - the 201st Guards Brigade (formerly the 200th Guards Brigade), holding an entrenched position called the Knightsbridge Box - were subjected to a determined German assault. The armoured brigades fought additional actions in support of the infantry, but during the cover of darkness it was decided to abandon the position. This marked a cornerstone of the battle, and the start of the Eighth Army's retreat from Gazala.[79][80]
North African Campaign
The division subsequently fought at Mersa Matruh, the First and Second Battles of El Alamein, at the Tebaga Gap, at the Mareth Line, in the Battle of Wadi Akarit and El Kourzia and in Tunis. In August 1942, Major-General Raymond Briggs was appointed to command and in July 1943 was succeeded by Major-General Alexander Galloway.[81]

From the end of the campaign in Tunisia in May 1943, which saw the surrender of almost 250,000 German and Italian soldiers, the 1st Armoured Division remained in North Africa until May 1944. The division, minus the 18th Lorried Infantry Brigade (previously 7th Motor Brigade, on loan to the 1st Infantry Division in the Anzio beachhead, only rejoining 1st Armoured in August),[82] then transferred to the Italian Front, arriving in Italy in late May.[83]
Italian campaign
The division came under command of V Corps,[82] under Lieutenant-General Charles Keightley, of the Eighth Army, commanded by Lieutenant-General Sir Oliver Leese. The 1st Armoured Division was the only British division, of six in total, to have fought at Alamein under Eighth Army command, to rejoin the army in Italy.[84] During the fighting in front of the Gothic Line throughout August and September, the 2nd Armoured Brigade suffered severe losses in tanks in the Battle of Coriano, with the 2nd Dragoon Guards (Queen's Bays), losing 31 tanks, out of 52.[85] Major-General Richard Hull took over command for this part of the campaign in August 1944.[81] The division was broken up soon after, due to a lack of sufficient drafts to replace casualties; the 2nd Armoured Brigade survived as an independent brigade and the 18th Infantry Brigade was broken up and used to fill gaps in other British divisions, mainly for the 46th and 56th Infantry Divisions.[86] The division was officially disbanded on 11 January 1945.[87]
Post War
In July 1946, the 6th Armoured Division was redesignated as the 1st Armoured Division. The 6th Armoured Division's insignia of a mailed fist was maintained. The division was located at Trieste, at the time within the boundary of the Kingdom of Italy. During 1947, the division was transferred to Palestine and was disbanded in September 1947.[88][89]
In the post-war years, the 1st Infantry Division was retitled as the 1st Division. Due to the lack of need for additional divisional headquarters based in England, the division was disbanded on 1 July 1960. At the same time, the 5th Division, based in Germany as part of the British Army of the Rhine, was renumbered as the 1st Division.[90] In 1978, that division was redesignated as the 1st Armoured Division. It went on to fight in the Gulf War during 1991, and was subsequently redesignated as the 1st (United Kingdom) Division.[91][92]
General officers commanding
| Appointment date | Rank | General officer commanding | Notes | Source(s) |
|---|---|---|---|---|
| 24 November 1937 | Major-General | Alan Brooke | The division was formed in the United Kingdom, as the Mobile Division. | [13] |
| 15 July 1938 | Major-General | Roger Evans | During Evan's tenure, the division mobilized for the Second World War. By the outbreak of the war, the formation had been redesignated as the 1st Armoured Division. In May 1940, the division was deployed to France and returned to the UK the following month. | [15][60] |
| 24 August 1940 | Major-General | Willoughby Norrie | [60] | |
| 5 November 1941 | Major-General | Herbert Lumsden | During Lumsden's tenure, the division was deployed to North Africa to fight in the Western Desert Campaign. Lumsden was wounded during an aerial attack, following the division's arrival in Egypt. | [60][58] |
| 3 January 1942 | Major-General | Frank Messervy | [60] | |
| 12 February 1942 | Major-General | Herbert Lumsden | Lumsden was wounded in action on 19 July 1942 | [60] |
| 19 July 1942 | Major-General | Alexander Gatehouse | Gatehouse was wounded in action on 22 July 1942 | [60] |
| 22 July 1942 | Brigadier | Arthur Fisher | Acting commander | [60] |
| 15 August 1942 | Major-General | Herbert Lumsden | [60] | |
| 19 August 1942 | Major-General | Raymond Briggs | The division entered the Tunisian Campaign during March 1943. On 5 April 1943, the division was redesignated as the 1st British Armoured Division | [60] |
| 27 April 1943 | Brigadier | Thomas Bosvile | Acting commander | [60] |
| 1 May 1943 | Major-General | Raymond Briggs | [60] | |
| 15 July 1943 | Brigadier | Robert Peake | Acting commander | [60] |
| 17 July 1943 | Major-General | Alexander Galloway | [60] | |
| 18 February 1944 | Brigadier | Edward Jones | Acting commander | [60] |
| 29 February 1944 | Major-General | Alexander Galloway | [60] | |
| 8 March 1944 | Brigadier | Richard Goodbody | Acting commander | [60] |
| 14 March 1944 | Brigadier | Edward Jones | Acting commander | [60] |
| 19 March 1944 | Colonel | John MacDonnell | Acting commander | [60] |
| 24 March 1944 | Brigadier | Edward Jones | Acting commander | [60] |
| 27 March 1944 | Major-General | Alexander Galloway | [60] | |
| 10 April 1944 | Brigadier | Edward Jones | Acting commander | [60] |
| 15 April 1944 | Major-General | Alexander Galloway | [60] | |
| 27 April 1944 | Brigadier | Edward Jones | Acting commander | [60] |
| 10 May 1944 | Major-General | Alexander Galloway | On 27 May, the division was transferred to Italy to take part in the Italian campaign. | [60] |
| 14 August 1944 | Major-General | Richard Hull | On 28 October 1944, the division ceased to be an operational formation. | [60] |
| 24 November 1944 | Lieutenant-Colonel | James Vogel | On 11 January 1945, the division was disbanded while based in Italy. | [60] |
| July 1946 | Major-General | Charles Loewen | The division was reformed in July 1946, and disbanded in September 1947 | [93] |
Orders of battle
Start of war and Battle of France
1st Armoured Division (September 1939–June 1940)[26]
1st Light Armoured Brigade (until 4 November 1939)
1st Heavy Armoured Brigade (renamed 3rd Armoured Brigade on 14 April 1940)
- 2nd Royal Tank Regiment
- 3rd Royal Tank Regiment (until 22 May 1940)
- 5th Royal Tank Regiment
2nd Light Armoured Brigade (renamed 2nd Armoured Brigade on 14 April 1940)
1st Support Group
- 1st Regiment, Royal Horse Artillery (until 20 October 1939)
- 2nd Regiment, Royal Horse Artillery (until 20 October 1939)
- 60th (Royal Welch Fusiliers) Anti-Tank Regiment, Royal Artillery (from 22 December 1939 until 14 February 1940)
- 101st Light Anti-Aircraft/Anti-Tank Regiment, Royal Artillery (from 15 February 1940)
- 1st Field Squadron, Royal Engineers (until 31 January 1940)
- 1st Field Park Troop, Royal Engineers (until 31 January 1940)
- 1st Battalion, Rifle Brigade (until 24 April 1940)
- 2nd Battalion, King's Royal Rifle Corps (until 24 April 1940)
Divisional troops
- 1st Armoured Divisional Signals, Royal Corps of Signals
- Royal Engineers
- 1st Field Squadron (from 2 January 1940)
- 12th Royal Lancers
North Africa campaign
1st Armoured Division (December 1941–May 1943)[94][95][96]
2nd Armoured Brigade (the brigade was detached from the division between 5–7 June and 11–12 June)
- 2nd Dragoon Guards (Queen's Bays) (until 26 June 1942, then from 2 August 1942)
- 10th Royal Hussars (until 4 July 1942, then from 2 August 1942)
- 9th Queen's Royal Lancers ((until 30 June 1942, then from 13 July 1942)
- 1st Battalion, Rifle Brigade (until 19 June 1942)
- 3rd/5th Royal Tank Regiment (from 7 July until 1 August 1942)
- 3rd County of London Yeomanry (Sharpshooters) (from 7 until 13 July 1942)
- 6th Royal Tank Regiment (from 7 July to 1 August 1942)
- 1st Battalion, King's Royal Rifle Corps (from 7 July to 1 August 1942)
- Queen's Own Yorkshire Dragoons (from 24 August until 18 December 1942)
- King's Own Yorkshire Light Infantry (from 19 December 1942)
22nd Armoured Brigade (from 23 April until 4 June 1942; from 7 June until 26 July 1942; from 31 July until 8 September 1942)
- Royal Gloucestershire Hussars
- 3rd County of London Yeomanry (Sharpshooters)
- 4th County of London Yeomanry (Sharpshooters)
1st Support Group (until 11 February 1942)
- 2nd Regiment, Royal Horse Artillery (from 31 January 1942)
- 11th Regiment, Royal Horse Artillery (until 29 January 1942)
- 61st Light Anti-Aircraft Regiment (until 26 January 1942)
- 76th Anti-Tank Regiment (until 29 January 1942)
- 82nd Light Anti-Aircraft Regiment (from 26 January 1942)
- 102nd (Northumberland Hussars) Anti-Tank Regiment (from 29 January 1942)
- 2nd Battalion, King's Royal Rifle Corps
200th Guards Brigade Group (from 12 February 1942; renamed 201st Guards Brigade Group on 21 May 1942; left 14 June 1942)
- 2nd Battalion, Scots Guards
- 3rd Battalion, Coldstream Guards
- 9th Battalion, Rifle Brigade (until 4 June 1942)
7th Motor Brigade (from 23 September 1942)
- 2nd Battalion, King's Royal Rifle Corps (until 18 December 1942)
- 2nd Battalion, Rifle Brigade
- 7th Battalion, Rifle Brigade
- 2nd Battalion, King's Royal Rifle Corps (from 15 January 1943)
Hammerforce (attached from 8th Armoured Division during the Second Battle of El Alamein)
- 4th/6th South African Armoured Car Regiment
- Royal Artillery
- 146th Field Regiment
- 73rd Anti-Tank Regiment
- 56th Light Anti-Aircraft Regiment
Divisional troops
- 1st Armoured Divisional Signals, Royal Corps of Signals
- Divisional artillery, Royal Engineers
- 2nd Regiment, Royal Horse Artillery (from 24 August 1942)
- 4th Regiment, Royal Horse Artillery (from 21 August 1942)
- 11th Regiment, Royal Horse Artillery (from 24 August 1942)
- 76th Anti-Tank Regiment (from 22nd September 1942)
- 42nd Light Anti-Aircraft Regiment (from 26 September 1942)
- Divisional engineers, Royal Engineers
- 1st Field Squadron (until 4 February 1942, then from 2 September 1942)
- 7th Field Squadron (until 19 March 1942, then from 1 October 1942)
- 1st Field Park Squadron (until 25 August 1944)
- 12th Royal Lancers (until 12 May 1942, then from 13 September 1942)
- 1st The Royal Dragoons (from 12 May until 13 September 1942)
- Royal Army Service Corps
- 10th Company (attached to 22nd Armoured Brigade)
- 925th Company (attached to 2nd Armoured Brigade)
- 903rd Company (attached to the 1st Support Group)
- 910th Company
- 911th Company
- 918th Company
See also
Notes
Footnotes
- These figures represent the war establishment, the on-paper strength, of an armoured division. In 1939, an armoured division was to have 9,442 men, close to 400 pieces of artillery, 351 tanks, and close to 3,000 vehicles in total. By 1944, a division was supposed to have 14,964 men, 126 pieces of artillery, 366 tanks, and around 4,000 vehicles in total.[1] Various organisational changes were introduced throughout the war that changed the required composition of armoured divisions. More information can be found at British Army during the Second World War and British armoured formations of the Second World War.
- British doctrine defined light tanks as reconnaissance vehicles armed only with machine guns. Cruiser tanks were swift moving, more heavily armoured, and equipped with both a machine gun and an anti-tank gun. The primary role of the cruiser tank was to engage and destroy opposing armoured forces. Its main weapon, a 2-pounder anti-tank gun, was only supplied with armour-piecing rounds. This meant that cruiser tanks were ineffective against entrenched infantry, or in suppressing hostile artillery.[17][18] The A9 provides an example of the light cruiser, and the A10 an example of a heavy cruiser.[19] Close support tanks were cruisers equipped with a howitzer, instead of an anti-tank gun, for firing smoke and high explosive rounds and were not intended to fight other tanks.[20]
- Liddell Hart had advocated for the complete restructure of the BEF to be a force of just two mobile divisions, which he argued would benefit the French more than four additional infantry divisions.[24]
- Julius was the codeword to bring troops to a state of readiness within eight hours. The codeword Caesar meant an invasion was imminent, and units were to be readied for immediate action. Kirke's plan assumed that the Germans would use 4,000 paratroopers, followed by 15,000 troops landed via civilian aircraft once airfields had been secured (Germany only actually had 6,000 such troops), and at least one division of 15,000 troops to be used in an amphibious assault.[30]
- The brigade subsequently fought at Calais.[41]
- Playfair highlights the similarity between this situation, and what occurred to the 2nd Armoured Division in April 1941.[63]
- No divisional breakdown is provided, but between the 1st and the 7th Armoured Divisions there was 167 M3 Grant medium tanks, 257 Crusaders, and 149 Stuart light tanks in the Gazala line.[67]
- Between 5–6 June, the 22nd Armoured Brigade was transferred to the 7th Armoured Division. In combat during these two days, at least 60 of its 156 tanks were lost.[75][76]
Citations
- Joslen 2003, p. 129.
- French 2001, pp. 28–29.
- French 2001, pp. 36–37.
- Winton 1988, pp. 187–188.
- Gibbs 1976, pp. 450–453, 473.
- Winton 1988, pp. 191–195.
- "No. 34382". The London Gazette. 23 March 1937. p. 1912.
- Perry 1988, p. 45.
- French 2001, p. 42.
- Crow 1971, p. 24.
- "Badge, formation, 1st Armoured Division & 2nd Armoured Brigade". Imperial War Museum. Retrieved 6 February 2022.
- Winton 1988, p. 196.
- "No. 34459". The London Gazette. 30 November 1937. p. 7517.
- French 2001, pp. 37–41.
- "No. 34536". The London Gazette. 29 July 1938. p. 4879.
- Joslen 2003, p. 4.
- Playfair et al. 2004a, p. 478.
- Zaloga 2015, pp. 80, 82.
- Fletcher 1993, p. 8.
- Playfair et al. 2004b, p. 345.
- Bell 1997, pp. 3–4.
- Bell 1997, pp. 258–275, 277–278.
- Gibbs 1976, pp. 503–504.
- Gibbs 1976, p. 511.
- Gibbs 1976, pp. 514, 525.
- Joslen 2003, pp. 13–14, 144, 148, 151, 215.
- Joslen 2003, p. 215.
- Joslen 2003, pp. 16, 144.
- Newbold 1988, p. 406.
- Newbold 1988, p. 40.
- Newbold 1988, pp. 39, 47–48.
- Newbold 1988, p. 63.
- Joslen 2003, pp. 144, 215.
- Joslen 2003, pp. 151, 215, 278.
- Newbold 1988, p. 411.
- Crow 1971, p. 28.
- Weinberg 1994, pp. 122–127.
- Collier 1957, p. 85.
- Crow 1971, p. 29.
- Ellis 1954, p. 254.
- Joslen 2003, pp. 144, 151.
- Ellis 1954, pp. 254–255.
- Fraser 1999, pp. 73.
- Ellis 1954, p. 255.
- Ellis 1954, pp. 104, 126, 256.
- Ellis 1954, p. 257.
- Ellis 1954, p. 259.
- Ellis 1954, p. 260.
- Ellis 1954, pp. 261, 263.
- Ellis 1954, pp. 272, 275.
- Ellis 1954, p. 278.
- Fraser 1999, pp. 75.
- Ellis 1954, pp. 298–301.
- Doherty 2013, p. 28.
- Newbold 1988, pp. 163, 427.
- Joslen 2003, pp. 14–15.
- Playfair et al. 2004b, pp. 114–115, 255–256.
- Playfair et al. 2004b, p. 136.
- Playfair et al. 2004, p. 31.
- Joslen 2003, pp. 13–15.
- Playfair et al. 2004, pp. 38, 73.
- Joslen 2003, pp. 13, 266.
- Playfair et al. 2004, pp. 92, 136–137.
- Playfair et al. 2004, pp. 140–147.
- Carver 2002, p. 56.
- Joslen 2003, pp. 13, 169.
- Playfair et al. 2004, p. 219.
- Carver 2002, p. 74.
- Playfair et al. 2004, p. 223.
- Carver 2002, pp. 78–79.
- Playfair et al. 2004, p. 224.
- Ford 2008, p. 41.
- Playfair et al. 2004, p. 225.
- Ford 2008, pp. 44–46.
- Playfair et al. 2004, p. 233.
- Carver 2002, p. 97.
- Playfair et al. 2004, pp. 240–241, 243.
- Ford 2008, pp. 65–66.
- Playfair et al. 2004, pp. 242–243, 249.
- Ford 2008, pp. 70–71.
- Joslen 2003, p. 13.
- Joslen, p. 14
- Joslen 2003, p. 15.
- Alexander's Generals, the Italian Campaign 1944–45, Gregory Blaxland, p. 167
- Alexander's Generals, the Italian Campaign 1944–45, Gregory Blaxland, p. 182
- Alexander's Generals, the Italian Campaign 1944–45, Gregory Blaxland, p. 202-203
- Joslen p. 13
- "Badge, formation, 6th Armoured Division & 1st Armoured Division". Imperial War Museum. Retrieved 2 February 2022.
- Lord & Watson 2003, p. 36.
- "Army Notes". Royal United Services Institution. 105 (619): 430-434. 1960. doi:10.1080/03071846009421132.
- Lord & Watson 2003, p. 25.
- "First In, First Choice, First Solution: 1st (UK) Division". Ministry of Defence. Retrieved 2 February 2022.
- "Obituaries: Sir Charles Loewen". The Times. No. 62545. 26 August 1986.
- Joslen 2003, pp. 13–14, 148, 168–169, 215, 244, 265–266.
- Sutton 1998, p. 136.
- Latimer 2004, p. 327.
References
- Bell, P. M. H. (1997) [1986]. The Origins of the Second World War in Europe (2nd ed.). London: Pearson. ISBN 978-0-582-30470-3.
- Collier, Basil (1957). Butler, J. R. M. (ed.). The Defence of the United Kingdom. History of the Second World War, United Kingdom Military Series. London: Her Majesty's Stationery Office. OCLC 375046.
- Carver, Michael (2002) [1986]. Dilemmas of the Desert War: The Libyan Campaign 1940–1942. Staplehurst, Kent: Spellmount Limited. ISBN 978-1-86227-153-1.
- Crow, Duncan (1971). British and Commonwealth Armoured Formations (1919–46). AFV/Weapons Series. Windsor: Profile Publications. OCLC 471709669.
- Doherty, Richard (2013). British Armoured Divisions and their Commanders, 1939-1945. Barnsley: Pen & Sword Military. ISBN 978-1-84884-838-2.
- Ellis, Lionel F. (1954). Butler, J. R. M. (ed.). The War in France and Flanders 1939–1940. History of the Second World War, United Kingdom Military Series. London: Her Majesty's Stationery Office. OCLC 1087882503.
- Fletcher, David (1993) [1989]. The Great Tank Scandal: British Armour in the Second World War Part 1. London: Her Majesty's Stationery Office. ISBN 978-0-11290-460-1.
- Fraser, David (1999) [1983]. And We Shall Shock Them: The British Army in the Second World War. London: Cassell Military. ISBN 978-0-304-35233-3.
- French, David (2001) [2000]. Raising Churchill's Army: The British Army and the War Against Germany 1919–1945. Oxford: Oxford University Press. ISBN 978-0-199-24630-4.
- Ford, Ken (2008). Gazala 1942: Rommel's Greates Victory. Botley, Oxfordshire: Osprey Publishing. ISBN 978-1-84603-264-6.
- Gibbs, N. H. (1976). Grand Strategy. History of the Second World War. Vol. I. London: Her Majesty's Stationery Office. ISBN 978-0-116-30181-9.
- Joslen, H. F. (2003) [1990]. Orders of Battle: Second World War, 1939–1945. Uckfield, East Sussex: Naval and Military Press. ISBN 978-1-84342-474-1.
- Latimer, Jon (2004). Alamein. Cambridge, Massachusetts: Harvard University Press. ISBN 978-0-67401-376-6.
- Lord, Cliff; Watson, Graham (2003). The Royal Corps of Signals: Unit Histories of the Corps (1920–2001) and its Antecedents. West Midlands: Helion. ISBN 978-1-874622-07-9.
- Newbold, David John (1988). British Planning and Preparations to Resist Invasion on Land, September 1939 – September 1940 (PDF) (Ph.D. thesis). London: King's College London. OCLC 556820697.
- Perry, Frederick William (1988). The Commonwealth Armies: Manpower and Organisation in Two World Wars. War, Armed Forces and Society. Manchester: Manchester University Press. ISBN 978-0-71902-595-2.
- Playfair, I. S. O.; et al. (2004a) [1954]. Butler, J. R. M. (ed.). The Mediterranean and Middle East: The Early Successes Against Italy (to May 1941). History of the Second World War United Kingdom Military Series. Vol. I. London: Naval & Military Press. ISBN 978-1-84574-065-8.
- Playfair, I. S. O.; et al. (2004b) [1956]. Butler, J. R. M. (ed.). The Mediterranean and Middle East: The Germans Come to the Help of their Ally (1941). History of the Second World War United Kingdom Military Series. Vol. II. London: Naval & Military Press. ISBN 978-1-84574-066-5.
- Playfair, I. S. O.; et al. (2004) [1960]. Butler, J. R. M. (ed.). The Mediterranean and Middle East: British Fortunes Reach their Lowest Ebb (September 1941 to September 1942). History of the Second World War United Kingdom Military Series. Vol. III. London: Naval & Military Press. ISBN 978-1-84574-067-2.
- Sutton, John (1998). Wait for the Wagon: The Story of the Royal Corps of Transport and its Predecessors 1794–1993. Barnsley: Leo Cooper. ISBN 978-0-85052-625-7.
- Winton, Harold R. (1988). To Change an Army: General Sir John Burnett-Stuart and British Armoured Doctrine, 1927–1938. Lawrence, Kansas: University Press of Kansas. ISBN 978-0-70060-356-5.
- Zaloga, Steven (2015). Armored Champion: The Top Tanks of World War II. Mechanicsburg, Pennsylvania: Stackpole Books. ISBN 978-0-81171-437-2.
- Weinberg, Gerhard L. (1994). A World at Arms: A Global History of World War II. Cambridge: Cambridge University Press. ISBN 978-0-52144-317-3.
Further reading
- Evans, Roger (1942–1943). "The 1st Armoured Division in France". The Army Quarterly. William Clowes & Sons. 45–47. OCLC 1101162373. (in three parts)
External links
- 1st Armoured Division in France 1940
- British Military History – British Armoured Divisions Italy 1943 – 1945
- Niehorster, Leo. "British, Colonial, and Dominion Armies: 1st Armoured Division, 3 September 1939". World War II Armed Forces – Orders of Battle and Organizations. Retrieved 3 February 2022.